Sunday, February 28, 2010

Video Tutorial how to make tabletop Martenici

As I promised, here is the video that I made on how to make the tabletop Martenici I showed to you yesterday!


I apologize for the video not having sound, but with 2 small kids running around I doubt you would have been able to do hear anything if I did record a sound. :-)
Anyway, I'm working on finding a good video editing program, so soon I'll have more of these videos with better quality, sound and subtitles, so both my English speaking and Bulgarian speaking audience can enjoy them!


For the Tabletop Martenici you will need:


2 small Styrofoam cones
2 small Styrofoam balls
2 toothpicks
a glue gun
regular liquid glue ( any kind you have in hand)
a brush for the glue
red and white yarn
4 beads
a wet cloth to wipe if something spills 


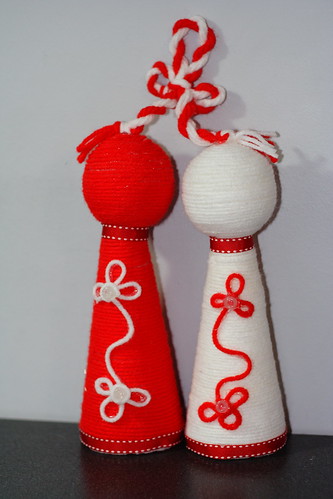
1. First you need to attach the "head" of the Martenici using the toothpick and the glue gun. After you do that, spread the liquid glue over the cone with a brush and start wrapping around the yarn. 


2. Once you finish wrapping the base with the yarn, continue over the "neck" and the base of the head of the martenici. 


value="http://www.youtube.com/v/OEygBU4MHmM&hl=en_US&fs=1&">name="allowFullScreen" value="true">name="allowscriptaccess" value="always">src="http://www.youtube.com/v/OEygBU4MHmM&hl=en_US&fs=1&"
type="application/x-shockwave-flash" allowscriptaccess="always"
allowfullscreen="true" width="425"
height="344">


3. Here is how you continue with the base of the head. For the lower part of the head you can use the regular liquid glue.


4. Once you get to the middle of the head it would be difficult to use the liquid glue and you'll need the help of the glue gun. 


5. And here is how you finish the "head" on top. 


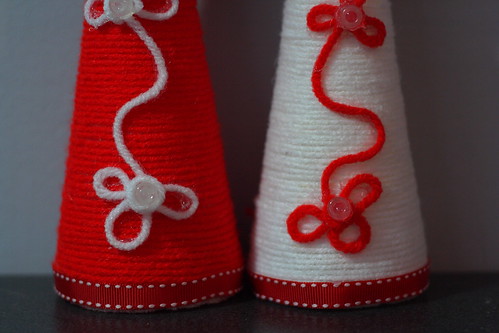
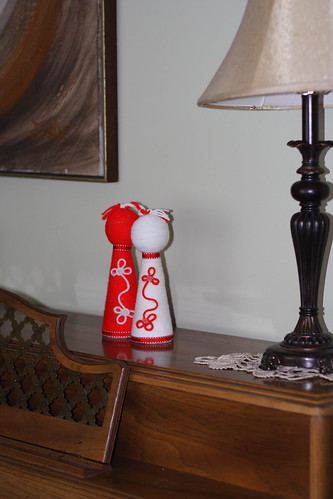
6. Once you are finished with both martenici, you can add all kinds of decoration you want. Here is what I did. 


I hope I have helped you out with and idea! Let me know if you try it!


Annie


How to make tabletop Martenici (Martenizi)

If you don't know what Martenici is, you should probably take a look at my previous postings about the tradition, the story etc.


Martenici 2009


Martenici 2008


I first made Martenici for my kids in 2008, because thanks to the Bulgarian Post Services, the martenici my mom sent me arrived at the end of April.
 I had no idea what to use, I haven't made any since I was a kid, but here is what I have used fro the last 2 years:
- red and white pom-poms( fuzz balls
-red and white yarn
- red and white pipe cleaners ( fuzzy sticks)
-red and white fabric,
red and white ribbons
- buttons, beads, artificial flowers etc.


You can use virtually anything you want!


This year I am going to participate in the " Turn off your TV night" at my son's school with "martenica-making" project. I am really excited that I can share this with the kids and I have plans on making it very special!
I wanted to bring to the school a large size Martenici, that can be a tabletop decoration, since I doubt there would be any place to hang ones that are for the wall.
Walking through the craft store I noticed the Styrofoam balls and cones that I  had an idea that would make wonderful tabletop decoration and even can be hanged on the wall.
I decided to try to make a tutorial on how you can make that too, so here is the result of my work yesterday.
The tabletop Martenici


martenici20100003


The details 1
martenici20100005


In a setting


martenici20100008


martenici20100010


Here is the VIDEO how to make these tabletop martenici!  

http://artcraft.anniesartbook.com/2010/02/video-tutorial-how-to-make-tabletop.html


I have made a lot of regular Martenici too, you'll see pictures and maybe video on that tomorrow. 


hope you like them and they inspire you to make yours! If you use any of the ideas, please let me know! I would love to see what you have made!

If you decide to use any of the pictures or video, please have the courtesy of providing a backlink to my site!


Annie

Tuesday, February 23, 2010

"Get well, Krum!"- Workshop

Last Friday my friend's kids and my kids got together to do a little project called " Get well, Krum!".
The kids were age 2, 3, 6, 9 and 10 years old. Unfortuantely I have pictures only of the 3 cards that the 9 and 10 year old girls made, but the small kids did a pretty good job too!
We all wish Krum well and we hope he recovers completely! He is in surgery today for a second time and we all pray for him!
I thought this would be a good idea for the kids to express their wishes and will make them feel like they are doing something to get him better!


KidsWorkshop0005


KidsWorkshop0004


KidsWorkshop0003


Thank you all for the support and thoughts!
Annie

Saturday, February 20, 2010

Generation next

I am always happy to see my kids doing artsy stuff, but they've surprised me really nice with these 3 cards and I liked them so much, that I wanted to share them with you!


my son, age 6 first
Kalin&EllieCards0002


my son, age 6 second card
 Kalin&EllieCards0001


my daughter, age 3 ( front)
Kalin&EllieCards0003


My daughter age 3 ( back)
Kalin&EllieCards0004


Do your kids make crafty things when you do too? 
Do you let them use your things or you buy them their own?

Friday, February 19, 2010

2 cards for 2 sisters

I am sorry I'll be very short today, but my dog is till not recovered from the surgery and all my time is devoted to him these couple of days. Thank you all for the good thoughts and support!

I hope he is going to be better tomorrow, so I can manage to post couple of things I've been planning on this weekend.


Here are 2 cards I did for 2 beautiful sisters that are my kids' friends.


Valentine's day cards0001


Valentine's day cards0002


Keep up the good thoughts for my puppy!

Tuesday, February 16, 2010

Butterflies and flowers

Yes, that is the Crazy challenge theme this week- butterflies and flowers!

I didn't feel like doing a card today, so I made a mandala called Butterflies and flowers.


Here is what I came up with:
FlowersButterfliesMandala0002


And here it is a little bit closer
FlowersButterfliesMandala0003


It is difficult to see the details in this size picture, click on it to see it bigger, it would show the butterflies better. 
Unfortunately this is the largest size I can show on my website. 


What do you think?

Monday, February 15, 2010

Ellie and her elephant- my Valentine's day surprise for my little girl

Đ•very girl has a stuffed animal, that at some point is special for her. My little girl's favorite toy is an elephant.

I was thinking since I drew a special cartoon character for Kalin - a black belt ladybug, I should do the same for Ellie too and the best way to make my little girl happy on this day I thought was to draw her with her best stuffed friend - the elephant Ellie ( yes, it has the same name! )

Here is what I came up with to to show this special relationship between a girl and her elephant!


1. The drawing, when I was still thinking what to put her to sit on, a bench sounded to trivial at the time.
Ellie&Elephant0001


2. Here is how the idea about the wall started taking shape
Ellie&Elephant0002


3. Here is the colored drawing, I used colored Prismacolor pencils. It would have been way better with Copics..I know. Sometime these days ....:-)

Ellie&ElephantColor0004


4. The card

Ellie&ElephantCard0001


5. The detail

Ellie&ElephantCard0003


6. The bling

Ellie&ElephantCard0004


7. Detail again


Ellie&ElephantCard0005 


* If you decide to use this image, at least please have the courtesy to link back to my website! Thank you! 

Saturday, February 13, 2010

A Valentine's Day card for the love of my life!

It is difficult to make something that would show everything you feel about this person. It is even more difficult to put these feelings in words.
But somehow once I got the idea about the structure of the card ( thanks Bleshtuchka for the awesome idea!)the design just happened. I started working on it and things just clicked.
The original structural design( the shape of the card) is from here. Everything else is my idea.


Here is how it stared:


1. On a white and black piece of paper( 5 " tall) I scored on 3" and 8"
ValentinesDayAlexCard0002


2. Here are the first basic shapes
ValentinesDayAlexCard0004


3. Here it is put together before I glued it
ValentinesDayAlexCard0005


4. Then I cut 2 black 5" by 4" pieces of paper for the cover
ValentinesDayAlexCard0003


5. Here is the finished card outside with the bow
ValentinesDayAlexCard0028


ValentinesDayAlexCard0029


6. The front cover
ValentinesDayAlexCard0006


7. The back cover
ValentinesDayAlexCard0008


8. The first set of flap pages, on one is written " YOU" on the other one " Forever", it can be read both ways.
ValentinesDayAlexCard0009


9. A different view of the same page
ValentinesDayAlexCard0010


10. The second page
ValentinesDayAlexCard0011


11. The second set of flap pages
ValentinesDayAlexCard0012


12. The third set of flap pages, reading "Love.." and " Is"
ValentinesDayAlexCard0013


13.The text on the left where the third flap pages are
ValentinesDayAlexCard0014


14. The text on the right where the third flap pages are
ValentinesDayAlexCard0015


15.The forth set of flap pages inside right
ValentinesDayAlexCard0020
ValentinesDayAlexCard0021


16. The forth set of flap pages inside left
ValentinesDayAlexCard0019


ValentinesDayAlexCard0022


17. The forth set of flap pages outside left
ValentinesDayAlexCard0025


18. The forth set of flap pages outside right
ValentinesDayAlexCard0026


19. The center page:


ValentinesDayAlexCard0018


20. A top view
ValentinesDayAlexCard0023


21. And the last one
ValentinesDayAlexCard0027


This is by far the biggest card project I ever made. My husband couldn't believe that I made it at first. He said that this was the best card he had ever received in his life and by the look on his face I believed him! :-)


I am also participating with this card in the Crazy Challenge, an awesome new blog challenge that 2 of my virtual friends made couple of days ago! Come and see how much fun we are having!

Popular Posts

Related Posts with Thumbnails